пятница, 27 апреля 2018 г.
понедельник, 16 апреля 2018 г.
AQA: Selenium + Java: Page Object Model

What it is?
Page Object is a Design Pattern for enhancing test maintenance and reducing code duplication.
A page object is an object-oriented class that serves as an interface to a page of your AUT.
The tests then use the methods of this page object class whenever they need to interact with the UI of that page.
The benefit is?
- if the UI changes for the page, the tests themselves don’t need to change, only the
code within the page object needs to change;
- Subsequently all changes to support that new UI are located in one place;
- enchancing test maintenance;
- reducing code duplication;
- There is a clean separation between test code and page specific code such as locators (or their use if you’re using a UI Map) and layout;
- There is a single repository for the services or operations offered by the page rather than having these services scattered throughout the tests;
- In both cases this allows any modifications required due to UI changes to all be made in one place;
Summary:
- The public methods represent the services that the page offers
- Try not to expose the internals of the page
- Generally don't make assertions
- Methods return other PageObjects
- Need not represent an entire page
- Different results for the same action are modelled as different methods
Links:
- docs.seleniumhq.org;
- git - PageObjects;
- git - PageFactory;
- Михаил Поляруш - video:
- page-object-model;
- Introduction to Page Object Model Framework;
- Simple Page Object Model example;
- Оптимизация теста с помощью Page Object. Часть 1. Создание классов с описанием веб-страниц;
- Оптимизация теста с помощью Page Object. Часть 2. Создание теста;
- Применение Property файлов в автотестах на Java;
- Использование паттерна Page Object;
- Подготовка Page Object Model - пример на автоматизации ФБ;
вторник, 10 апреля 2018 г.
AQA: Java: Java 9 – Exploring the REPL
1. Introduction
This article is about jshell, an interactive REPL (Read-Evaluate-Print-Loop) console that is bundled with the JDK for the upcoming Java 9 release. For those not familiar with the concept, a REPL allows to interactively run arbitrary snippets of code and evaluate their results.A REPL can be useful for things such as quickly checking the viability of an idea or figuring out e.g. a formatted string for String or SimpleDateFormat.
2. Running
To get started we need to run the REPL, which is done by invoking:
1
| $JAVA_HOME/bin/jshell |
1
| $JAVA_HOME/bin/jshell -v |
3. Defining and Invoking Methods
Methods can be added by typing their signature and body:
1
2
| jshell> void helloWorld() { System.out.println("Hello world");}| created method helloWorld() |
1
2
| jshell> helloWorld()Hello world |
4. Variables
Variables can be defined with the normal Java declaration syntax:
1
2
3
4
5
6
7
8
9
10
11
| jshell> int i = 0;i ==> 0| created variable i : intjshell> String company = "Baeldung"company ==> "Baeldung"| created variable company : Stringjshell> Date date = new Date()date ==> Sun Feb 26 06:30:16 EST 2017| created variable date : Date |
1
2
3
| jshell> File filefile ==> null| created variable file : File |
5. Expressions
пятница, 6 апреля 2018 г.

AQA: Selenium: Execute TestNg Project using batch file
Execute TestNg Project using batch file
Here, we have one sample class called SampleTest.java in JAVA Project which would open Google in chrome browser and verify the page title and then closes the browser at the end.
1
2
3
4
5
6
7
8
9
10
11
12
13
14
15
16
17
18
19
20
21
22
23
24
25
26
27
28
29
30
31
32
33
34
35
36
37
38
39
40
41
42
43
| import org.openqa.selenium.WebDriver;import org.openqa.selenium.chrome.ChromeDriver;import org.testng.annotations.AfterMethod;import org.testng.annotations.BeforeMethod;import org.testng.annotations.Test;public class SampleTest { WebDriver driver; @BeforeMethod public void setup() { // Initialize driver object System.setProperty("webdriver.chrome.driver", System.getProperty("user.dir") + "/lib/chromedriver.exe"); driver = new ChromeDriver(); // Launch Application on browser driver.get(baseUrl); } @Test public void test01() { String expectedPageTitle = "Google"; String actualPageTitle = ""; // Fetch page title and store it in a variable actualPageTitle = driver.getTitle(); // Print title System.out.println(actualPageTitle); if (actualPageTitle.equals(expectedPageTitle)) { System.out.println("Test case passed"); } else { System.out.println("Test case Failed"); } } @AfterMethod public void tearDonw() { // close browser driver.close(); }} |
четверг, 5 апреля 2018 г.
AQA: tools: git - the simple guide. just a simple guide for getting started with git. no deep shit ;)
create a new repository
create a new directory, open it and perform agit initto create a new git repository.
checkout a repository
create a working copy of a local repository by running the commandgit clone /path/to/repositorywhen using a remote server, your command will be
git clone username@host:/path/to/repository
workflow
your local repository consists of three "trees" maintained by git. the first one is yourWorking Directory which holds the actual files.
the second one is the Index which acts as a staging area and
finally the HEAD which points to the last commit you've made.
add & commit
You can propose changes (add it to the Index) usinggit add <filename>git add *This is the first step in the basic git workflow. To actually commit these changes use
git commit -m "Commit message"Now the file is committed to the HEAD, but not in your remote repository yet.
pushing changes
Your changes are now in the HEAD of your local working copy. To send those changes to your remote repository, executegit push origin masterChange master to whatever branch you want to push your changes to.
If you have not cloned an existing repository and want to connect your repository to a remote server, you need to add it with
git remote add origin <server>Now you are able to push your changes to the selected remote server
branching
Branches are used to develop features isolated from each other. The master branch is the "default" branch when you create a repository. Use other branches for development and merge them back to the master branch upon completion.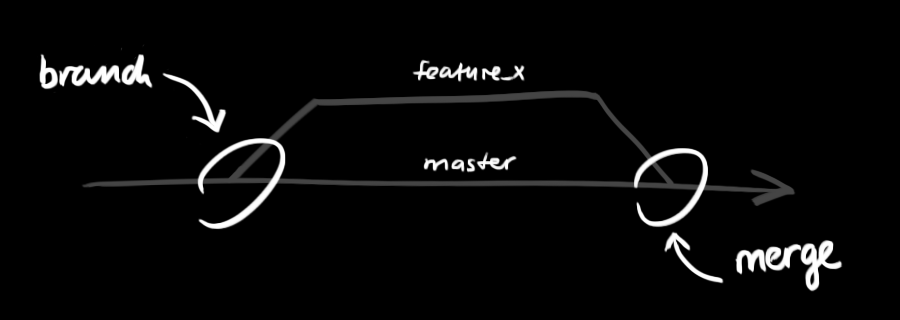
create a new branch named "feature_x" and switch to it using
git checkout -b feature_xswitch back to master
git checkout masterand delete the branch again
git branch -d feature_xa branch is not available to others unless you push the branch to your remote repository
git push origin <branch>
update & merge
to update your local repository to the newest commit, executegit pullin your working directory to fetch and merge remote changes.
to merge another branch into your active branch (e.g. master), use
git merge <branch>in both cases git tries to auto-merge changes. Unfortunately, this is not always possible and results in conflicts. You are responsible to merge those conflicts manually by editing the files shown by git. After changing, you need to mark them as merged with
git add <filename>before merging changes, you can also preview them by using
git diff <source_branch> <target_branch>
tagging
it's recommended to create tags for software releases. this is a known concept, which also exists in SVN. You can create a new tag named 1.0.0 by executinggit tag 1.0.0 1b2e1d63ffthe 1b2e1d63ff stands for the first 10 characters of the commit id you want to reference with your tag. You can get the commit id by looking at the...
log
in its simplest form, you can study repository history using..git logYou can add a lot of parameters to make the log look like what you want. To see only the commits of a certain author:
git log --author=bobTo see a very compressed log where each commit is one line:
git log --pretty=onelineOr maybe you want to see an ASCII art tree of all the branches, decorated with the names of tags and branches:
git log --graph --oneline --decorate --allSee only which files have changed:
git log --name-statusThese are just a few of the possible parameters you can use. For more, see
git log --helpreplace local changes
In case you did something wrong, which for sure never happens ;), you can replace local changes using the commandgit checkout -- <filename>this replaces the changes in your working tree with the last content in HEAD. Changes already added to the index, as well as new files, will be kept.
If you instead want to drop all your local changes and commits, fetch the latest history from the server and point your local master branch at it like this
git fetch origingit reset --hard origin/master
useful hints
built-in git GUIgitkuse colorful git output
git config color.ui trueshow log on just one line per commit
git config format.pretty onelineuse interactive adding
git add -i
links & resources
graphical clients
- GitX (L) (OSX, open source)
- Tower (OSX)
- Source Tree (OSX & Windows, free)
- GitHub for Mac (OSX, free)
- GitBox (OSX, App Store)
guides
get help
среда, 4 апреля 2018 г.
AQA: Selenium: TestNG - used config
- add plugin to pom file:
- than you can find your report in folder
</dependencies>- and config your testng.xml file:
<build>
<pluginManagement>
<plugins>
<plugin>
<groupId>org.apache.maven.plugins</groupId>
<artifactId>maven-surefire-plugin</artifactId>
<version>2.21.0</version>
<!--configuration>
<suiteXmlFiles>
<suiteXmlFile>src/test/resources/testng.xml</suiteXmlFile>
</suiteXmlFiles>
</configuration-->
</plugin>
</plugins>
</pluginManagement>
</build>
</project>
<!DOCTYPE suite SYSTEM "http://testng.org/testng-1.0.dtd" >
<suite name="Suite1" verbose="1" >
<test name="Nopackage" >
<classes>
<class name="ua.aqa.aqa"/>
</classes>
</test>
</suite>
- than you can find your report in folder
"..\project\target\surefire-reports"
Подписаться на:
Комментарии (Atom)
SEO: Эксперимент: как Яндекс и Google учитывают ключевые слова в URL
Эксперимент: как Яндекс и Google учитывают ключевые слова в URL Эксперимент: как Яндекс и Google учитывают ключевые слова в URL Дата пу...

-
SQL Developer: Method 1 Add the comment /*csv*/ to your SQL query and run the query as a script (using F5 or the 2nd execution button o...
-
iMacros: команды, скрипты, примеры оригинал тут Здравствуйте, уважаемые читатели блога LifeExample , хочу поз...
-
Эксперимент: как Яндекс и Google учитывают ключевые слова в URL Эксперимент: как Яндекс и Google учитывают ключевые слова в URL Дата пу...


